Showing posts with label beets. Show all posts

Friday, August 8, 2014

Simple Japanese-Style Pickles

Cook once - eat lots... and with a simple preparation that keeps the veggies in great shape for days and days - even 2 weeks.  Wouldn't that be great?

Well, not only is that possible, it is within reach of just about everyone, and takes little or no heat.  With beets, carrots, cabbage and chard stems from my Oxbow CSA box, lets go.

Real quick - pickling may seem hard, or something everyone is doing.  Neither of these reasons should hold you back from picking up the rice vinegar and pickling some of your summer vegetables.

There are many flavors of pickling, and several methods - this is just one.  The fact that this is particularly easy, and it compliments lots of other flavors, makes this a great way to start.

So... onto the show.

Quick Japanese pickles
Top: non-traditional spicy beet pickles
Left: traditional carrot & cabbage pickles
Right: chard stem pickles

The fastest pickles are made with vegetables you'd eat raw anyway.
Some of the reasons I love them:
No heat,
Stay moist and crunchy for days,
Quick addition to dinner, sandwiches (hellloooooo Banh-Mí), and salads.

One con - does take some time.  But if you are doing other things and have a timer, it is worth the investment of your effort, both that day, and on into the future.

 How To:

Cut up your veg - pretty small for this style. For about 4 C of cut veg, sprinkle with 1tsp of salt.  Above I have 2 C carrots and 2 C cabbage.  Let the salt drain the veg for about 20 minutes.  
Squeeze the vegetables gently to remove the drained water.

Last of all:
1/3 C rice vinegar
3 Tbs sugar (white)

Combine everything.  It is ready to go now, and ready for the next week or so.

I kept the vegetables separate to drain (as advised in several Japanese cookbooks), but combining everything when you add the sweetened vinegar is fine.  And no, you don't need to rinse the vegetables since you want some salt in your pickle.  

Any crispy or crunchy vegetable you enjoy eating raw is great for this approach.
Some good vegetables to consider - 
carrots, diakon radish, ANY radish, kohlrabi, peppers, cucumbers, tiny baby zucchini, cabbage,  fennel, sweet onions and red onions.


The next category is vegetables that need a quick blanch/boil - and then a swim in the pickle.
That is what I did with the chard stems.  (They were from the chard that I used for the goma-ae).  The only difference is you put the salt in with the sugar and vinegar.

Choose your vegetable that needs a little cooking, boil it for a few minutes until it is just barely fork tender, drain, then toss it hot into the vinegar, sugar, salt mixture.  Let it sit and cool.  Eat it all up.
(Alternately, you can boil it in the pickling mixture - just double the amount of mixture, and add 1/3 C water)

Some good veggies for this are chard stems, broccoli, cauliflower, asparagus, beets, scapes, sliced winter squash and green beans.

The way I made those beet pickle unconventional was by using a different vinegar - in this case

spicy Filipino vinegar. (The brand Datu Puti is also what to look for if you want to play with Cane Juice Vinegar for Adobo).  And for this one, I cooked the beet IN the vinegar.

Ingredients:
1/3 C Sukang Masssim (or any other vinegar spiced with those evil little chilies)
1/3 C Rice Vinegar
1/3 C water
1 tsp salt
3 Tbs sugar

Beets - peeled and sliced into 1/4 in (or thinner) slices.

Boil the beets IN the pickling liquid for about 20 minutes.  Test with a fork at 15 minutes...
When they are barely fork tender, let them cool (they'll keep softening a bit more as they cool).

And you can spicy-vinegar-up any of these veggies.

Once again - more flavor and little or no heat!

Have fun.

Friday, July 18, 2014

Fava Bean & Beet Salad


I dunno where YOU are, but up here in the Pacific North West, the sun has been shining more than usual - and around here that is a good thing.  The result is beautiful beets, the arrival of the fava beans and spectacular lettuces.  And then, fresh garlic is here to.  That means salads with garlicky vinaigrette.

This year, I ran across a fascinating hybrid of Chioggia (candy stripe) beets and golden beets.  They ended up looking particularly psychedelic.

The hardest part about this salad is the fava beans - they need to come out of their well-padded, fuzzy pods AND out of their tough, slippery, light green skins.  But go ahead, don't be afraid.  Jump in and try this one.  It is worth the effort.  Other than the lettuce, everything is really hearty, so you can make  lots of beets, onions and beans one cool night, then make this salad over and over on hot steamy days.

Fava Bean & Pickled Beet Salad
(Serves 1 for an excellent lunch.  Multiply for the crowd you have.  OR, make lots, and have the salad several times.  The pickled beets and blanched favas keep for about a week in the fridge.)

This is what you do with favas and beets to make them easier to handle – which is important when you find out how tasty this combination is.

Ingredients:
beets - 2 small, any color
fava beans 4-5 pods
lettuce – 1 small head or 5-6 leaves from a large head
fresh cheese – crumbles (think goat cheese, queso fresco, feta)
sweet onion – ¼ of a large one, or 1 small
herbs – a handful of what’s handy (dill & parsley are excellent)

pickling liquid –
water – 1 C
vinegar – ½ C (rice, cider or wine)
peppercorns – 6
cinnamon stick – 1 (or 6 allspice berries)
cloves – 2 whole
salt – 2 tsp
sugar – 2 Tbs

dressing –
3 Tbs used pickling liquid
pepper (& salt) -  to taste
mustard – 2 tsp
garlic – 2 cloves (fresh garlic if you see it!)
tasty oil - ¼ C (nice olive oil is excellent here)

optional – garlic bread or nifty crackers

Equipment:

knife
cutting board
vegetable peeler
saucepan
slotted spoon
2 – 3 medium and small bowls
sauce pan with lid
whisk or fork
small snap-top container with tight lid for mixing dressing (or another bowl & whisk)
salad spinner (optional)
salad bowl or serving plate
measuring cups and spoons

Prep:

Grab the fava pods.  Break off the stem end, use it to pull the sting off the top seam of the pod.  Pull out the beans (but leave them in their skins – the trick for getting them off is a little further down).
Chop the greens off the beets if they have them.  If they are small, tender and tasty looking, put them with your lettuces, or to the side for cooking later (just like chard).
Peel the beets with your vegetable peeler.  Slice them into wedges the thickness of your pinky, or thinner.
Rinse and dry your lettuce, and any optional herbs (use your salad spinner here if you have one).
Slice the onion thinly.
Measure out all the dressing ingredients into the small snap-top container EXCEPT for the pickling liquid.
Measure out the pickling liquid ingredients into the saucepan.

Cook:
Put the pickling liquid ingredients in the saucepan, on the stove.  Bring to a boil.
Put the fava beans in the boiling liquid.  Fish one out with the slotted spoon after 3 minutes – run under cool water so you can handle it.  See if the bean slips out of the  pale green skin easily.  If not – try each minute until they do.  When the skin slips off easily, scoop out the rest of the beans and let them cool in one of the small bowls.


Put the sliced beets and half the onions into the pickling liquid.  Bring to a boil, then reduce to a simmer.  Let them simmer until they are fork tender – this will take about 10 minutes.

While the beets are cooking, peel the fava beans (run under cool water if you need to, so you can handle them).  Also chop or crumble a tablespoon or two of cheese.

Make the optional garlic bread or toast.

When the beets are cooked through, take the saucepan off the heat.

Add 3 Tbs of the pickling liquid to the dressing and shake it well to combine all the ingredients.


Combine the chopped herbs, beets, fava beans and onions (both pickled and raw) and cheese.  Toss with enough dressing to make the salad tasty.  Enjoy with our without the garlic bread.

Variation:  If you are using regular onion, pickle it all!
Add, subtract and substitute ingredients as you need to.

Sweet lettuces like little gem, romaine, Boston and bibb are especially good.  Roasted nuts and seeds go well in here as well.

Thursday, October 25, 2012

"Mom, Does 'Earthy' Mean it Tastes Like Dirt?"

Beets.

I tell ya', love or hate 'em.

At least that's what I thought 'till I gave them another try.  Because I had nothing to say to a beet except, "no thank you."  But they started showing up in my CSA box.  And they last forever.  I mean I can ignore arugula for 2 weeks, and then can throw it away without guilt - because it has gone bad.  But those beets, they were still beets a month later.  So not to be daunted, I tried fixing them in some desperate new ways.  And found some things that made me say, "huh?  These actually have potential."  And through sheer force of personality - or force of something, I got my husband to try them (again) too.

Here's the thing.  Except for the adorable, non-threatening early baby beets that are the size of walnuts:


most beets come across like this:


Definitely associated with dirt, and - in this case actually - bigger than your head.  Just not appealing.

And then beet lovers insist on serving them like THIS:
Look at their stripy-ness!
 or this
borscht - you have to try it!  See it has sour cream, it's great!
(apologies to Simply Recipes -
it actually looks like a very good borscht recipe)
 or this
beet salad - where you can really taste the beet-i-ness

But for the rest of us - well, beets do taste a bit, err, ummm earthy.  ("Say it mom, they taste like dirt!")
OK, no ducking out of it, there is definitely the taste of the soil about them.  Or well, really - they are awfully sweet for a vegetable (high sugar content), and they are very low in sodium (taste very bland to our sodium desiring palates), and have a pretty neutral pH (are neither sour - acid, nor bitter - basic).  So  for most of us, they are in dire need of adjustment.

And as the boy genius in my life pointed out, if they were just cut up smaller, they could actually be good.

After all - who goes around chomping up huge plain mouthfuls of arugula, watercress, kale, broccoli or even spinach?  All of these veg need help, and do best when given the appropriate companions.

So how to adjust your beets so they are fit to go out in public - and get consumed:

Step 1:  Make them smaller.  Even the baby beets, when I first tried them raw, were "wafer-thin" to quote a little Monty Python.

BAD:  bigger than a fork

GOOD: very-thin or small beety-bits suitable for matching with other produce.

Step 2: Find good flavor contrasts.  Sharp, Sour, and Crunchy all compliment and elevate the beet.  It after all is soft, sweet and somehow bland.  And, yes, earthy.
But the beet also has a complex set of flavors, that when uncovered, are actually good - no, great!
So do not serve them alone to novices.
Match them with the right partners.

Sharp (or pungent) flavors include  - onions, bitter greens, or strong cheeses.  And radishes - also sliced thin.

Sour - vinegar or citrus.  Use sour-er vingars like cider and rice rather than sweeter ones (like balsamic). Lemon and lime juice or grapefruit segments.

Crunchy - Nuts! Toast!  Beets when properly cooked do have a "cooked carrot" texture about them that can be off putting to those that have bad childhood vegetable memories (I see the raised hands) or continue to have issues with certain textures (and the other hands).  But throwing a handful of roasted pistachios, hazelnuts or almonds can do wonderful things.
And eaten with a crispy piece of toast (with garlic butter?), or a crispy salty cracker - well, now we're talkin'.

All of these tamp down the bad and pop the good to the top.

Step 3: Dressing!  They are a vegetable, and they don't have (much) sodium.  And the sweet benefits from a little pungent heat (mustard and garlic).

So get out a small tupperware with a water-tight lid.  Use it to shake up your tasty vinaigrette dressing.

Basic Vinaigrette - in the small tupperware
a) pinch of salt, pinch of pepper
b) 1 crushed/chopped garlic clove (or 1tsp minced garlic)
c) 2 Tbs acid (vinegar or citrus juice)
d) 1tsp mustard (any kind)
e) 4 Tbs oil - (something tasty if you have it)

pop on the lid - shake it 'til it's cloudy and combined

Note: taste and add salt and pepper and vinegar as needed.  You can whisk this all together in a small bowl with a whisk or a fork too.

Now, make a salad.

BOWL - choose one big enough to toss things around
BIG SPOONS - for tossing your salad - OK any salad servers will work
In the bottom - beet bits (cubes), chopped onions
pour in plenty of dressing to coat (you only made a little dressing - you'll be OK) and toss the onions and beets.

Wash your greens.
Find that handful of nuts.
Cheese - break up the blue cheese or goat cheese into small chunks.

Toss everything together.
Toast the bread - or find the crackers.

And then make it look something like this.
Yup - I had GOLDEN beets for this.  
Enjoy.

P.S. For whatever reason - beets pair better with gin, vodka (The Russians!) and bitter beer than they do with wine.  But if you MUST have wine, dry white.


Tuesday, October 23, 2012

Time to Roast... Vegetables

It is sunny, shiny fall here in the NorthWet...err West.  After our dismal spring and June, the sun just won't stop shining.  And it has made for some amazing fall produce.

And a bunch of it is big, pumpkin big, if you know what I mean.

So what to do with it?

Admire it 1st.

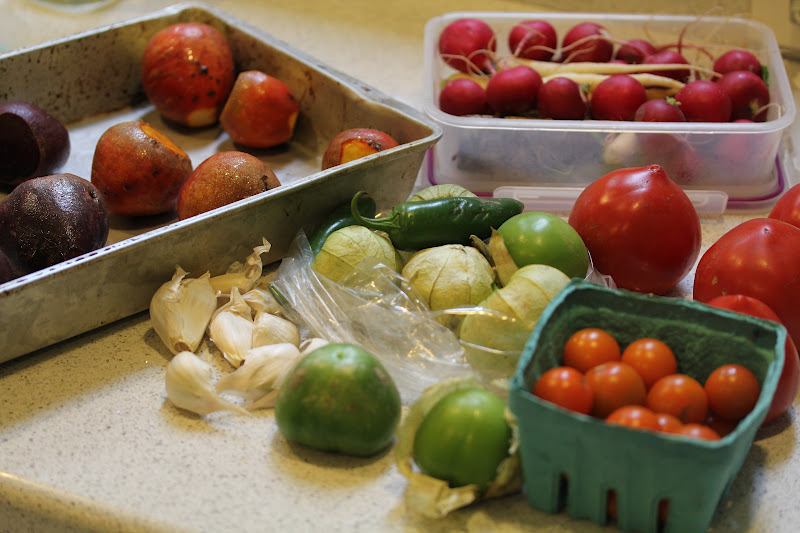
Beets, garlic, tomatillos, jalapeños, tomatoes - regular & cherry
radishes and carrots
pie pumpkins, butternut squash, leeks - oh yeah, and the chicken scraps bag

Holy Full Fridge, Batman!  What to do with it all?

Step one - cut it down to size.  Those whole veggies take up a bunch of space.

Step two - dedicate a day to roasting everything into freezable food.  And MUCH of that is done through the magic of roasting.  By driving off excess water, and breaking down the plant cells by tasty cooking, they are all set up to freeze.  If these are frozen raw - the water/chemical balance ends up with mushy and sometimes rotten (blechk!) food.

It's take a big chunk of a day but the longest part of the prep - the roasting - is done (and because it mostly happens at 425˚F) and done together.  Pumpkins and Peppers don't mind sharing oven space with Radishes and Beets.  And while things are roasting you can do lots of other thing - as long as you don't have to leave the house.

So what are the results from a day spent that way?

Tomatillo-Garlic-Jalapeño Sauce

Roast everything until it gets mushy -pull of the stems
peel off the skins,
(optional remove some/all seeds from the jalapeños)
blend them together - add a little salt.
Perfect over leftover mole beef... if you have it.
Lots of other stuff if you don't.

Roasted beets - and other veg
(see the next post for more on beets - or check out some flash backs:
-or-
-or-

Pumpkin Puree and Roasted Squash Wedges and Chunks

Dedicate the time to making these - and then THERE THEY ARE ready to go into whatever you want 

- things like...


and the new best thing ...

Pumpkin Mushroom Polenta 
Made lots - freezing this for later use.

(the pumpkin takes the place of the Parmesan - and makes it creamy and savory - and perfect for all stripes of "no dairy" folks -OR- a super way of sneaking in extra veg.)

That is coming up too...


Thursday, October 27, 2011

It's Cold Baby... Bake Me Somethin' Good and Warm

This morning had a gorgeous sunrise - a good while AFTER I was up.
And when we walked to school, we could see our breath.
(This is going to be one of these silly conversational posts - here's just the recipe for Roasted Root Veggies.)

Are We being spoken of?


And I am loosing patience with the cat as he lingers at the door deciding, "how long do I sit here before she closes the door in my face."

Ok, I don't actually know what my cat is thinking, but I am more impatient when my toes are getting cold while he's doing it, and I swear he's taking longer about it.


All of this means Fall is here.
And I want something warm, cozy and full of flavor.
And we got one of the last CSA bags of the season full of roots of all sorts.

carrots, beets, parsnips, potatoes & onions
and some kale & sage - yes I know, those are leaves.
Roots!  Isn't that a bunch of stuff that grows underground?
Like, in the dirt?

"Mom, your build up to introduce beets isn't fooling anyone.  You are going to try to convince people to eat beets."

"Well, kale and parsnips too." "Hey, I don't know how to type that noise."  "Or that one."


"And mom, you know cooking carrots ruins them.  Ruins them!"

"Not always."

"Does so."

"Look - you're going to have to take a..."

"I know I know, a no thank you bite.  kkKkKKkkkkkKKk."


Anyway, I'm starting with a pile of vegetables.  And I'm not even going to pretend, all that rinsing and peeling and chopping, along with the other prep happens in a flash.  It doesn't.  It will take time, and make a pile of peelings.

Cooked root veggies freeze GREAT!  Especially par-cooked.  Why do you think the freezer isle at the grocery store has an entire "potatoes" section.

So I am taking on this pile once to make lots of...

"Boring!  Yes, very good cook once, eat lots.  Get it."

"Aren't you impatient."

"Hungry."

Alrighty Then.  The root veggies get turned into chunks, the beets thinner, 'cuz they are the toughest.
Salt and oil on a sheet pan at 425˚F.


"See always with the 425˚F.  What's wrong with 350?"

"Better for baking.  I like the hint of a crispy edge on my parsnip."

For 20 minutes.

"How are you going to work in the bacon drippings?  You know most people just throw away their dirty used grease."

"Hey, that grease hasn't been used.  The bacon had too much, the stuff in the dish in my fridge is what it couldn't use.  And it's not dirty, just seasoned.  And I'm going to use it with the sage and kale.  And chicken stock.  So there."

When you get everything par cooked - Tupperware!

"Isn't that just a brand name, that you happen to not be using?"

"It works if everyone knows what I'm talking about."

"Until the Tupperware police come and get you."

Anyway... do this:

 3 servings.  1 for now, 2 for the freezer.

To finish all of them, all parts - the root veg, the kale, the herbs.  Stir in a little vinegar and bake at 425˚F until super tasty.

Truffle salt may be good here too for finishing it off.

"It's not optional.  That thing you did with the frozen ones with the rice vinegar and soy sauce wasn't as good.  Truffle salt all the way.  OK.  The carrots weren't ruined.  I still like them raw better though."

Fall Roasted Root Veggies

Just want to bake some steal-out-of-the-pan good root veggies with out all the drama?
This is very definitely a use what you have kinda recipe.

The two secrets - 1) removing water from root veggies creates more intense flavors,
2) cooking at a higher heat breaks down the natural starches and sugars to make yummy brown flavors (OK, it caramelizes them.  I hate how that word has been overexposed and overused of late.)

Here ya' go.

Roasted Root Veg

Equipment:
knife
cutting board
vegetable peeler
baking sheet
sauté pan w/ a lid
(snap top container - for freezing extra servings)

Ingredients:
12 - 15 root vegetables (include starchy, sweet & earthy if you can)
Choose From
-potatoes
-beets
-parsnips
-onions
-carrots

a drizzle of salt
2 tsp oil


small handful sage
(& I had parsley too - so a big one of parsley)
2 tsp bacon drippings (or oil, or butter)
1/4 - 1/2 C chicken stock/water

1 lb (+/-) hearty leafy dark greens
Choose From
-kale
-collards
-chard
-beet greens
-mustard greens are good too if you like that kick.
(stay away from the cabbage-y stuff for this.)

balsamic vinegar - 1 Tbs per baking pan.
truffle salt - to taste (sprinkle, stir, taste, repeat until perfect)

Prep:
All the root veg.  Rinse them off so they are not muddy.
Cut off the fuzzy roots (let your parsnips stay pointy!) and any other parts you wouldn't want to eat.
Peel off the tough outer skin with your vegetable peeler.
Cut up the veg into bite size pieces, and make the beets thinner, since they are tougher and need more cooking.  The onion pieces can be a bit larger.


Place these on your baking sheets
(I had 2 pans worth!)
Spread them out so they are not stacked.

Sprinkle a bit of oil and salt on your veg, and toss thoroughly (clean hands works great).


Kale, collards and mustard all have a stem
like a stick.  Not yummy.  Pull it out.
Rinse your leaves and herbs well.
Tear the big heavy stems out of your greens (you can just chop up chard, stems and all).  Tear or chop the leaves into pieces hand size or smaller.

The herbs need to be chopped fine.


Cook!
Heat your oven to 425˚F
Pop the veg in for 20 minutes.

While the veg are roasting, heat up your sauté pan with the fat in it.  Toss in a piece of sage, when the pan is warming up over medium high heat.  When it sizzles, stir in the rest of the herbs until they are fragrant.  Toss in the leaves, and get them coated in the fat and herbs.  Stir for a minute or so.
Add the stock, clap on the lid, lower the heat to medium and cook for about 8 minutes.  The leaves need to be limp, but not necessarily cooked to done.

Pull the par-cooked veg out of the oven at the end of 20 minutes and lower the heat to 375˚F.

Combine all the veg.  If you have made a "whole bunch" this is where you cool and freeze servings for later.  See below for the "from frozen" directions.

Toss the veg on the pan with vinegar, and a pinch of the truffle salt.
Back into the oven for 15 more minutes.

Check the veg.  Are they tender?  A tiny bit of browning?  When they get there, pull them out and toss them together in a bowl.  Taste for vinegar and salt.
The sweet of the carrots and/or beets and/or parsnips should be met with a little sour from the vinegar.  And taste for salt - and mysteriousness of the earthy truffle.  Add a little more of either if it is needed.

And suddenly what may have been a bad idea in the frozen section becomes something that gets stolen out of the pan before it gets to the table.

***From Frozen***

Heat your oven to 375˚F
Spread the veg (roots & leaves) out on your pan.
Toss with the Tbs of vinegar and a sprinkle of the truffle salt.
Roast for at least 25 minutes.  Again, check for the browning, and intensified flavor.  When you get there, finish the same way.
Not instant, but darn fast.  And darn good.

Thursday, July 14, 2011

Break for Beets!

(and I mean Take a Break!)

Back from the cruise, I at last get my next bag from Tiny's CSA.

Cherries!  Well that's easy.  Cherries go with everything & nothing.

Deeper down in the bag I have fennel, baby onions, lettuces, cabbage, peaches, potatoes...
And I have the beets left from before we left.  That is one of the best features of beets - they'll be there for you.

So-o-o-o-o....
 Beet salad with Wilted Onions and Fennel,  Orange-Fennel Dressing & Toast

Ingredients:

3-4 baby beets
1 small fennel bulb sliced thin
1 baby (small, early) onion sliced thin
3 Tbs goat cheese

1 Tbs fennel fronds - the feathery parts only, chopped
Juice from 1/2 of an orange + 1 Tbs white wine (or similar) vinegar
- or - 2 Tbs balsamic vinegar
1 tsp goat cheese
1 clove green garlic minced
salt & pepper - to taste
1 Tbs + a little more olive oil (break out the good stuff)

Prep:

Preheat the oven to 450˚
Trim the leaves and the scraggly root end off the beets.  Give them a good scrub, and rub some oil on them.  Put them in the smallest pan they'll fit it in a single layer.  Pop them in the oven for 40 - 50 minutes.  They are done when a knife slides in easily.  (This can be done a day or two before...)
Let cool, and scrub/peel the skins off.  Wash your hands immediately to avoid the dreaded "pink finger"!
Chop roughly into bite size pieces.

Slice the onions and fennel thin.  Place in saute pan over medium heat, with a little oil and a sprinkle of salt.  Start a sweat of these ingredients - warm them to soften and release some liquid.  Take them off the heat when they are still crisp.

Make the dressing by stirring the juice/vinegar with the teaspoon of your goat cheese.  Stir in the minced fennel and garlic.  Add salt and pepper to taste.
slowly add the oil while stirring the dressing with a fork.

Combine all the vegetables with the dressing.  Only stir a few times to avoid turning everything pink.
Scatter the crumbled goat cheese over the salad.

I added a couple of pieces of toast, brushed with olive oil.


Enjoy yourself, and leave behind a bright pink puddle.

Friday, August 27, 2010

Beet Salad - with the goods!

If you liked the last beet salad, and your were not run out of the town on a rail by those that were served the raw beet salad, you are ready for the next round of....

"See, Beets Aren't So Scary After All."

Roasted chioggia beets are an approachable pink,
not a scary red.
The cornbread is just a bonus


This one has beets, beet greens, pistachio nuts, goat cheese, and plenty of vinegar.

But the wonderful thing about this beet salad is it can take several substitutions.


Ingredients:

4 small to medium beets (nothing larger than your fist)
4 1/2 inch slices of goat cheese
small handful of roasted nuts - pine nuts, pistachios and pecans are all good choices
1 overflowing handful of a dark green - nothing too tough (beet greens, chard, tender kale, arugula etc.)
1/2 tsp oil + 1 tsp oil/bacon drippings
salt & pepper (if you have truffle salt, break it out here!)
cider or wine vinegar - to taste

Equipment:

pan for roasting beets & foil to cover... or just wrap beets in foil
cutting board
sharp knife
medium bowl
utensils for mixing and eating the salad
Saute/fry pan & spatula

Cook!

Cut off the beet tops, and the roots, and give them a good rinse.  Rub the beets with the 1/2 tsp of oil to speed up cooking.
Roast the beets in the oven at 425˚F for about 1 hour (this can even be done a few days ahead) until they are fork tender (a fork easily pierces them).
Let the beets cool all the way down.
Use your fingers or a towel to rub off the tough outer skin.

Cut the beets into thumb size pieces, place in your bowl.
grind on some pepper, and add a pinch of salt.  Toss with at least a Tbs of vinegar, and set aside while you get on with the rest of the prep.

Rinse your greens, chop or tear roughly if they are large leaves.  Heat a saute pan with the 1 tsp of bacon  drippings or oil over medium high heat.  Saute your greens until they are tender, and have wilted down to a tiny huddled mass.
Toss in the nuts and heat them through as well.
Keep an eye on things.  Toasty nuts are good. Burnt nuts are yucky.

Slice the goat cheese, and crumble into pieces.

Toss together the beets, nuts and greens.
Taste.  Add salt, pepper and vinegar as needed.
Taste with a piece of the goat cheese to see if there is enough tanginess.

Serve the salad over the crumbled goat cheese.

Baby Beet Salad...(super easy, no cooking required).

Beets can be scary.

And rightly so, the Celts used to carve them, place a candle inside and put them out for Samhain ("sow-when" or prehistoric Halloween).  And if you are wondering how they got a candle into those fist sized things, you haven't seen how big a beet can get.  If left all summer and fall in the ground, they can get, literally, as big as your head.

And a big purple-red head sized thing, carved and glowing with a candle inside.  THAT would be terrifying.

But beets can also be tasty.

One of the strangest things about beets is their strange vegetable sweetness combined with their soft cooked-carrot texture, and their ability to turn the whole world pink.
I won't lie, I even shy away from the vibrant red beets much of the time (though they do make a good crayon), and lean toward the golden beet, or the candy-striped chioggia.

This salad is about moving away from the scary, unfamiliar bits of beets, and making them worth a second look.

Ingredients:

2 -3 "baby" beets (very small)
a large handful of baby lettuce leaves (to stay with a theme) - or anything tender
2 Tbs olive oil
1 Tbs mild vinegar (rice, champagne, something that doesn't curl your nose hairs right off when you smell it)
1 tsp mustard
1 clove garlic smashed to smithereens
salt & pepper

Equipment:

carrot peeler
cutting board
sharp knife
(mandolin or V-slicer - helpful but not essential)
medium bowl
whisk or tightly closing small container
utensils for serving and eating the salad

Cook!


Make the dressing - in your salad bowl combine the vinegar, mustard and a little salt & pepper.  Whisk in the garlic, and then slowly pour in the oil as you whisk... or place all of the above in a little container, clap on the lid and shake like crazy.

Give the beets a rinse and a bit of a scrub.
Chop off the leaves and the roots (the scraggley hairy bit at the bottom).
Use your carrot peeler to peel off the skin.
Then use a mandolin, V-slicer, or your carrot peeler to make "wafer-thin" slices of your beet.

Put these in the salad bowl with your dressing.

Wash the lettuce greens, tear up if they are big, or leave whole if they really are baby.

Toss it all together.

TA-DA!  Salad!

The chioggia beets are especially striking looking - all stripey and cool!