Some things are best when you don't over-think.
Waffles are definitely that. There are fancier recipes, but none faster - and likely to make you happy every time.
Basic Waffles
Use this amount for two adults and 1 or 2 small kids. For bigger kids, or more people, double it.
Ingredients:
1 C flour
1.5 Tbs sugar
1/2 tsp baking powder
1/2 tsp salt
1 egg
2 Tbs butter
1 C milk
Equipment:
waffle iron
medium bowl
cereal sized bowl
fork
measuring cups and spoons
1/4 cup measure
small bowl for melting butter
vegetable oil and brush - or spray to oil the waffle iron
Prep:
Melt the butter in the microwave in a very small microwave safe bowl. Set aside to cool to the touch, but not harden.
Measure out all the dry ingredients (flour, sugar, baking powder, salt) into the medium bowl. Use the fork to quickly stir them together.
Cook:
Turn on the waffle iron to medium. Oil the plates.
While the waffle iron is heating, break the egg into the cereal bowl, and beat with the fork. Add about half the milk and stir them together. Add the butter, stir that in too. Dump these liquids into the dry ingredients, stir about 5 times with the fork. Add some or all of the rest of the milk to make a pourable and slightly lumpy batter (about 10 more stirs - no more!).
Use the 1/4 cup measure to pour batter into the center of the heated, oiled waffle iron.
Check the result of the first one when your indicator says "Done!"
Use a little more or less batter, and possibly adjust the temperature setting to get what you want.
Variations:
Blueberry Waffles - Add the batter as usual, but just before closing the lid, scatter a handful or two of berries over the batter. Fresh or frozen are fine. Raspberries and Blackberries work too. Very large berries benefit from being cut in half.
Ham Waffles - Super "breakfast for dinner" fodder. Cut about 1 C of cubes from thickly sliced ham. (Ask for 2-3 1/4" thick pieces at the deli counter). Sprinkle them in the same way blueberries are sprinkled in. Bacon is also acceptable.
Tuesday, July 23, 2013


Monday, July 15, 2013
Sauerkraut Salad Dressing
Summer Time is Salad Time!

I've been getting some of the most delicious sauerkraut in my CSA boxes, and enjoying it with sausage and the spicy "kim chi"type with Korean short ribs. But the sour, crunchy, tingly stuff deserves more exposure, and we got these delicious sweet Nantes carrots in the CSA box.
They are so sweet and fresh that I didn't want to waste any tender crunchiness by using my carrot peeler.

And then using my knife to just scrape off the few hairy roots that were clinging on, and maybe a bit of the tougher surface skin:
So I needed to figure out a way to bring together the carrot and the tasty, tasty, crunchy, lip-smacky sauerkraut. Now pickled carrots are a good thing, so I figured the two should go together, but the sweet of the carrots needed a little more salty to go with the sauerkraut, and maybe a little creamy to smooth out the flavor. Which is how I came up with this fermentation three-fer:

I've been getting some of the most delicious sauerkraut in my CSA boxes, and enjoying it with sausage and the spicy "kim chi"type with Korean short ribs. But the sour, crunchy, tingly stuff deserves more exposure, and we got these delicious sweet Nantes carrots in the CSA box.
 |
| fat, stubby and super sweet! |
They are so sweet and fresh that I didn't want to waste any tender crunchiness by using my carrot peeler.
So I gave then a good scrub with the trusty brush I go just for the purpose:

And then using my knife to just scrape off the few hairy roots that were clinging on, and maybe a bit of the tougher surface skin:
 |
| You can see little bits of the scraped skin on the knife and cutting board. |
Sauerkraut Salad Dressing
Ingredients:
Oly-Kraut Sauerkraut (start with one of the "plain" flavors, rather than a "spicy" one.)
yogurt
soy sauce
Equipment:
knife
cutting board
small bowl
spoon
Prep:
Take a couple of spoonfuls of sauerkraut, and chop it so there are no big pieces, and scrape it into the bowl.
Cook!
Add just enough yogurt to coat the sauerkraut.
Then gently drip the soy sauce in until the salty, sour and creamy balance each other.
Add to a salad of crispy, crunchy, sweet vegetables and some fresh sweet lettuce leaves.
Add just enough yogurt to coat the sauerkraut.
Then gently drip the soy sauce in until the salty, sour and creamy balance each other.
Add to a salad of crispy, crunchy, sweet vegetables and some fresh sweet lettuce leaves.
Saturday, July 13, 2013
Five Spice Garlic Crab - on a Boat
Ever have
that wok-fried, still in the shell, spicy garlic crab at a Chinese
restaurant?

I have, twice. This is not the sort of thing your average, neighborhood, week-night, take-out joint is going to have. First of all, this doesn't take out. Second, it has to be done with fresh, live crab. It doesn't work anywhere near as well if you just douse already cooked crab with the flavors. And it should be eaten as soon at you can handle the crab.

I have, twice. This is not the sort of thing your average, neighborhood, week-night, take-out joint is going to have. First of all, this doesn't take out. Second, it has to be done with fresh, live crab. It doesn't work anywhere near as well if you just douse already cooked crab with the flavors. And it should be eaten as soon at you can handle the crab.
What I'm
trying to say is, getting this at a restaurant is kind of an event. Just finding a restaurant that makes this
specialty is an important start. And
then getting there may be an ordeal.
(The second time I got my hands on such a specialty was in Boston's
China Town. So yes, getting to the
restaurant was something of an
ordeal.) And both these restaurants were
well known for their food - and thus required a reservation, or an ocean of
patience for a walk-in table, if that had even been available.
But if
you find yourself with a decently large burner on a boat (or kitchen that is crab adjacent), a wok-ish pan,
 |
| There's the pan on my awesome Force-10 stove |
(mine's a sauce pan/sauté pan cross that kinda works like a wok), enough oil, a head of garlic, salt and some Five-Spice powder, when you pull up some crabs - well then nothing could be easier.
Well, throwing them
back is easier, and steaming them whole is easier, and so is building a small IKEA
bookshelf. But it is totally doable.
I suppose
you can also round up the same ingredients at home, and pick up 2 live
Dungeness crabs at the fish market/counter, but where's the sense of
adventure? OK, I will concede live crabs
in the kitchen is pretty adventurous.
So how
does this go down?
You need
some decent crab-handling skills, though rubber-banded claws help. For a quick video on how to clean live crabs,
check out this earlier post. (crab dispatching - boat optional, a dock or deck edge or railing actually works better.)
Once the
crab is split and cleaned, Use scissors or a cleaver (or your bare hands...
grrrrrrrrr!) to cut the crab legs into segments at the joints.


Discard the pointy tip toes - they have no meat - or not enough to pursue.
Try to cut the joints cleanly to minimize this:


Discard the pointy tip toes - they have no meat - or not enough to pursue.
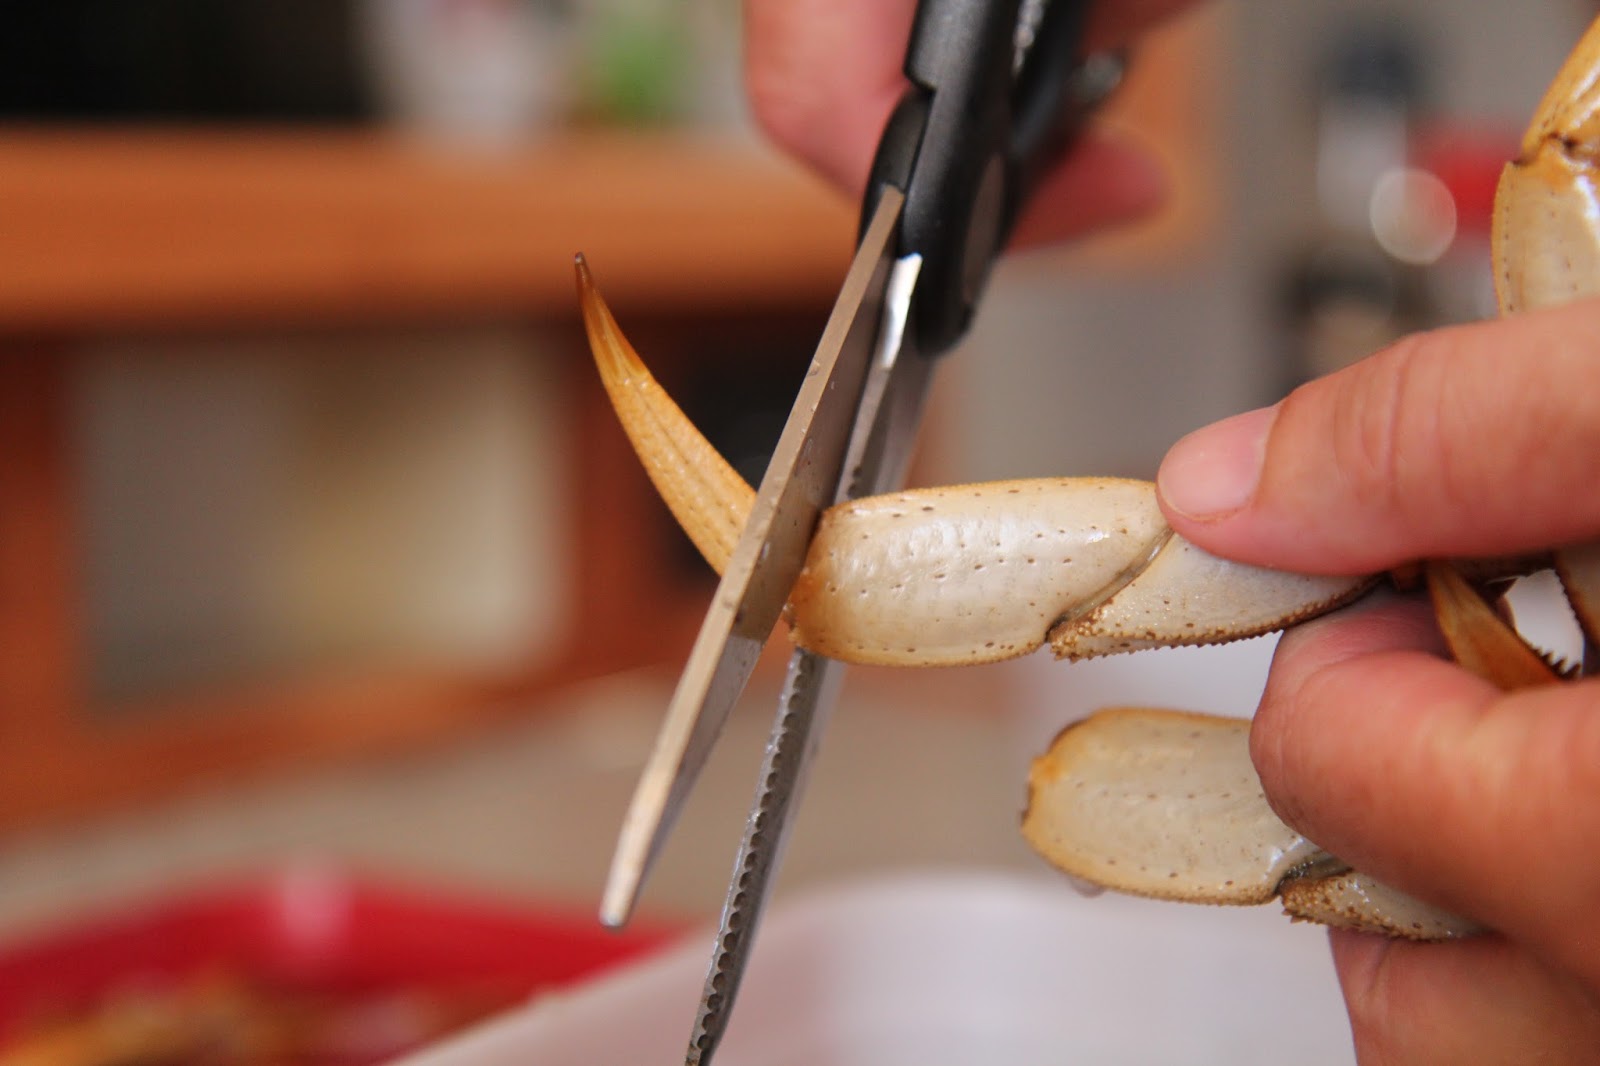 |
| Though the toes make great tools for picking out meat if you don't have picks. |
 |
| Try to keep the meat IN the shell so it doesn't get overcooked |
Chop/cut the cleaned, de-legged body into 4-6 chunks.
 |
| The shell is pretty thin, you can snip around if cutting it like this seems to crush the body. |
Then
follow this recipe:
Five
Spice Garlic Wok Fried Crab
Ingredients:
1 - 2
Dungeness Crabs* cleaned and cut up as described above.
1 head
garlic
1-2 tsp
Chinese five-spice powder
1/2 tsp
salt
several grinds black pepper
several grinds black pepper
1/4 C oil
Equipment:
Wok or
other large bowl shaped pan
Large
stirring spatula
Slotted
spoon
Paper
towels
(Tongs)
Serving
platter
Crab
cracking device (nut crackers and pliers work in an emergency)
Prep:
Set the
cleaned, split crab to the side. Break
up the head of garlic, and get all the big cloves (don't worry about the
annoying, tiny ones in the center).
Smack each of the cloves hard enough to crack the skin (heel of your
hand, bottom of a pot, etc.).
Peel them and slice them thinnish. The garlic pieces need to be small enough to fry into garlic chips, but big enough to not burn instantly, nor drive you insane when you need to retrieve them. 6-8 slices per clove is a good guess.
Peel them and slice them thinnish. The garlic pieces need to be small enough to fry into garlic chips, but big enough to not burn instantly, nor drive you insane when you need to retrieve them. 6-8 slices per clove is a good guess.
Set out
the paper towels, ready for draining the fried garlic.
Measure
out the salt and spice and mix together.
Cook!
Heat the
oil in the wok over high heat. Use a
garlic slice as a temperature gauge. When it starts to get crispy, turn the
heat back to med-high, pluck it out, and add the sliced garlic. Stir to get it crispy, but still blond.
Remove
the garlic chips onto the paper towels to drain.
Turn the
heat back to high, and place 1/3 - 1/2 of the crab in the oil. There needs to be plenty or room to stir fry
the crab. After the shell turns red
(this happens quickly), sprinkle on 1/3 - 1/2 of the spice-salt. Keep stirring for about 2 minutes.
Remove
the cooked crab to the serving platter, and repeat until all the crab has been
cooked.
Sprinkle
the garlic chips back over and serve.
Eat with
your hands. Have a shell bowl and plenty of non-special napkins (paper towels) on hand.
Garlic
noodles and a mess of sautéed spinach would go great with
this.
A crisp white wine (Sauvignon Blanc, Dry Riesling, dry Chardonnay) or a dry Chinese Beer all go great with such
a thing as well.
Sunday, June 23, 2013
Radish & Chive Butter
 |
| Radish slices and Chive Butter |
Spring CSA deliveries are often full of sharp, peppery and green flavors. And this year is no exception. How to enjoy these strong flavors?
 Smooth out the bright green oniony flavor with butter - and a bit of salt and vinegar to create a fuller flavor. Think I'm crazy? Well, the french have a tradition of butter and salt with their radishes. And who doesn't love garlic butter?
Radishes & Chive Butter
Ingredients:
radishes
chives & butter
(approx 1:1 ratio)
cider vinegar - splash
salt - to taste
Equipment:
knife
cutting board
food processor or fork
Prep:
Scrub the radishes clean, and rinse the chives.
Set up the food processor - or chop the chives very fine.
Cook!
Combine the chives and butter until you have very green butter. Add a pinch of salt and a splash of vinegar. Taste for a slightly tart flavor, and just enough salt to make the flavors in the butter a little more savory - not necessarily salty.
Slice the radishes. In half or quarters if small - or into slices if they are large slices like we got.
Eat 'em up.
Tuesday, June 11, 2013
Garlic Scape Pasta
Fried bread crumbs. This is an item that screams all that we are told is bad. Too much processed wheat, gluten, fat, fried, and yeah - they are better with salt.
Well, some days you just gotta eat what tastes good. Especially when you make it your self (mostly), and The Garlic Scapes are here. And they won't be here for long.
Make something that will make you remember why you love them. And don't worry about the bad. It will only happen once (or twice) and, and a seasonal indulgence is what living is all about. Enjoy! And then let it go - the seasons roll on.


Garlic Scape and Bread Crumb Pasta
(Step 0: Don't leave fresh bread on the counter while making the kittehs stay inside on a nice day.)
Ingredients:
6-10 garlic scapes
3 oz (fistfull) spaghetti/long noodles
sweet Italian sausage (or similar)
3 Tbs olive oil
2 handfuls bread crumbs (I used Panko)
salt & pepper
(red pepper flakes - optional)
(bread and nasturtium-shallot-garlic butter, optional)
Equipment:
large pot and lid
colander
sauté pan
stirring spatula
knife
cutting board
serving bowl
spaghetti spoon thingy

Prep:
Set the large pot with water over high heat and bring the noodle water to a boil.
While waiting for the water to boil -
Cut up the scapes - I like to do it on the bias. Slice the buds on top in half or quarters (depending on how big they are).
Cook the sausages (pan fry or grill - or just pull pre-cooked ones from your freezer), and slice them.
Cook!
Cook the pasta noodles according to directions. (If they finish before you do the rest of the steps, drain the noodles, and add just enough oil to keep the noodles from sticking)
Heat a splash of oil some oil in a sauté pan over medium-high heat. After 3 or so minutes (or a test bread crumb sizzles), add the bread crumbs and start to stir or toss vigorously. When they look toasty, take them off the heat. Then add salt and optional red pepper flakes to taste. Dump them in a bowl, and set them aside.
 Add another splash of oil, get the pan hot over medium-high heat, then add the garlic scapes and a pinch of salt. Sizzle and stir them until the scapes soften and get a few brown edges.
Toss the cooked sausage slices at the end to heat them up, and maybe brown the edges a bit.
Stir together the noodles, the scapes and the bread crumbs.
Serve with amazing garlic bread, and sliced sausage. Light, slightly acidy red wines goes great with this. (Chianti, Sangiovese, Montepulciano)
Well, some days you just gotta eat what tastes good. Especially when you make it your self (mostly), and The Garlic Scapes are here. And they won't be here for long.
Make something that will make you remember why you love them. And don't worry about the bad. It will only happen once (or twice) and, and a seasonal indulgence is what living is all about. Enjoy! And then let it go - the seasons roll on.
Garlic Scape and Bread Crumb Pasta
(Step 0: Don't leave fresh bread on the counter while making the kittehs stay inside on a nice day.)
Ingredients:
6-10 garlic scapes
 |
| What are garlic scapes? It is the stalk that grow up out of hard neck garlic in the spring with a bud on top that will eventually bloom in to a flower that looks a bunch like a lily. (well they are in the same family - alium - as lilies) soft neck garlic is where we get the cloves. They also come in not curly. |
sweet Italian sausage (or similar)
3 Tbs olive oil
2 handfuls bread crumbs (I used Panko)
salt & pepper
(red pepper flakes - optional)
(bread and nasturtium-shallot-garlic butter, optional)
Equipment:
large pot and lid
colander
sauté pan
stirring spatula
knife
cutting board
serving bowl
spaghetti spoon thingy

Prep:
Set the large pot with water over high heat and bring the noodle water to a boil.
While waiting for the water to boil -
Cut up the scapes - I like to do it on the bias. Slice the buds on top in half or quarters (depending on how big they are).
Cook the sausages (pan fry or grill - or just pull pre-cooked ones from your freezer), and slice them.
Cook!
Cook the pasta noodles according to directions. (If they finish before you do the rest of the steps, drain the noodles, and add just enough oil to keep the noodles from sticking)
Heat a splash of oil some oil in a sauté pan over medium-high heat. After 3 or so minutes (or a test bread crumb sizzles), add the bread crumbs and start to stir or toss vigorously. When they look toasty, take them off the heat. Then add salt and optional red pepper flakes to taste. Dump them in a bowl, and set them aside.
 Add another splash of oil, get the pan hot over medium-high heat, then add the garlic scapes and a pinch of salt. Sizzle and stir them until the scapes soften and get a few brown edges.
Toss the cooked sausage slices at the end to heat them up, and maybe brown the edges a bit.
Stir together the noodles, the scapes and the bread crumbs.
Serve with amazing garlic bread, and sliced sausage. Light, slightly acidy red wines goes great with this. (Chianti, Sangiovese, Montepulciano)
Thursday, May 23, 2013
Eggs 'n' Herbs 'n' Lettuce
Hello sunshine!
Even if you are hiding behind a cloud, I know you are there.
Even if it is raining so hard the drops bounce and fall a second time, I know you are there, because it isn't dark. And my cat is starting to do his passive-aggressive SUPER LOUD purr in my ear before the alarm goes off.
Which is his oh-so-gentle way of saying, "Hey lady! You, with the thumbs! It is light outside, so why are you sleeping. Change my water so I can splash it around and then come nap in your warm spot."
Anyway, it also means that the Farmers Markets are open and the herbs I repotted are keepin' up with the weeds, and the hens all over the Pacific NorthWe(s)t are cackling away over their new spring eggs.
Egg Salad time my friends!

Prep:
 Remove the eggs from the hot water with a slotted spoon. Place them on the kitchen towel so they can dry and cool enough to handle.
(Paleo and Gluten Free people - ignore the bread but still go make this)
(For my longest readers - yes, this is a revisit, but THIS time, I wrote down a recipe!)
Even if you are hiding behind a cloud, I know you are there.
Even if it is raining so hard the drops bounce and fall a second time, I know you are there, because it isn't dark. And my cat is starting to do his passive-aggressive SUPER LOUD purr in my ear before the alarm goes off.
Which is his oh-so-gentle way of saying, "Hey lady! You, with the thumbs! It is light outside, so why are you sleeping. Change my water so I can splash it around and then come nap in your warm spot."
Anyway, it also means that the Farmers Markets are open and the herbs I repotted are keepin' up with the weeds, and the hens all over the Pacific NorthWe(s)t are cackling away over their new spring eggs.
Egg Salad time my friends!

Egg Salad Sandwich - the good kind
(for 1 sandwich - multiply as needed)
Ingredients:
handful of herbs
(parsley, cilantro, basil, chives, oregano, maybe a little mint - whatever is available.)
2 eggs
lettuce
mayonnaise
1/2 tsp mustard
salt & pepper to taste
bread
Equipment:
pot with a lid
slotted spoon
kitchen towel
"cereal" sized bowl
fork
Prep:
Fill the pot about half full of water, enough to cover the eggs, plus a little.
Place the eggs in gently, and out on high heat.
Keep an eye on it while rinsing and chopping up the herbs.
Also give the lettuce a quick rinse and dry.
As soon as the eggs come to a full, rolling boil. Turn off the heat and let them sit there for about 5 minutes. If you end up letting them sit for half and hour, they will still be fine.
Cook:
Remove the eggs from the hot water with a slotted spoon. Place them on the kitchen towel so they can dry and cool enough to handle.
Give them a few gentle knocks on the counter, and peel off the shell.
Tear the peeled eggs in half, and put them in the cereal bowl. Start mashing them with a fork. Add a spoonful of mayo, the mustard, and the herbs. Mash until chunky, but well mixed. If it looks too dry, add a little more mayonnaise.
Taste for seasoning. Add salt and pepper until it tastes just right.
Spoon some on to some bread, toss a lettuce leaf on top, finish making the sandwich and enjoy.
Variations:
There's no rule that says you HAVE to make it a sandwich. Crackers are good, as are sliced veg, tortillas or other flatbread.

Popping egg salad inside a hollowed out cherry tomato makes you look fancy!

Popping egg salad inside a hollowed out cherry tomato makes you look fancy!
My favorite lazy way to make hardboiled eggs is in my electric kettle. Put in the eggs, hit the on switch, and get back to the eggs in a bit.
(For my longest readers - yes, this is a revisit, but THIS time, I wrote down a recipe!)
Sorrel Gremolata
Sorrel.
When poor Bilbo Baggins finds himself on the other side of the Misty Mountains in The Hobbit, pony-less and thus provision-less, one thing he grabs to eat along the trail is sorrel.
One of the first greens of spring, it brings a fresh burst of vitamin C, which in the raw state comes across as pucker sour. No lemons you say? At the start of spring, get your sour here.

Ingredients:
sorrel - handful
garlic cloves - 1 or 2
blanched almonds - small handful (optional)
Equipment:
cutting board & knife
or
small food processor
Prep:
Wash the sorrel and remove the stems.
Peel the garlic.
Cook:
Chop the garlic and sorrel (and optional almonds) into smithereens.
Ta-Da!
Gremolata as sour as you'd ever like, and not a lemon in sight.
Use to top anything that needs a little kick.
I used it on these giant beans, but it is great on cooked carrots, baked potatoes, roasted squash, fish baked in butter, garlic, parsley, salt & pepper, or mixed into mayo on a sandwich. The last Tbs goes into the base of a salad dressing perfectly.
Subscribe to:
Posts (Atom)